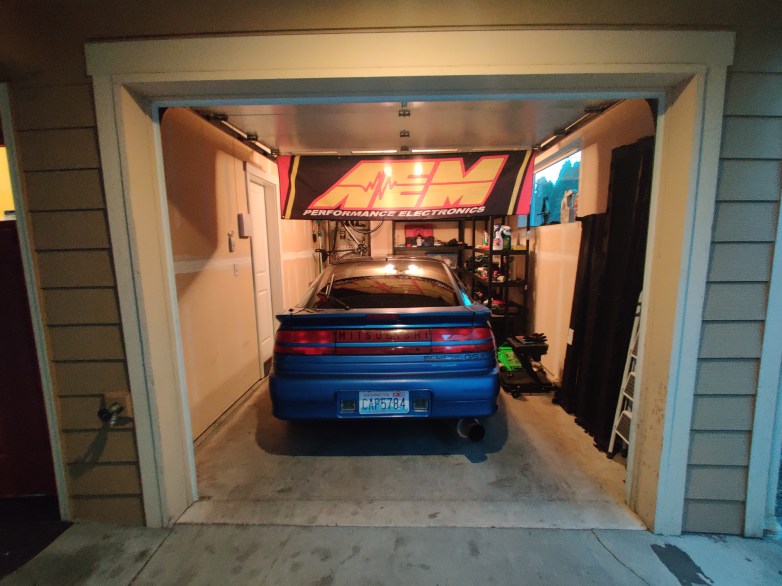
It’s been a good while since my last post, mostly because it’s been a while since I’ve had the time to do work on the Eclipse. But that time has come to end, and it’s time for an update!
I’ve made two notable changes to the car, and one set of diagnostics since I last worked on it, one change was relatively small, and one is kindof a big deal! So let’s get the big deal out of the way.
It’s ECMLink
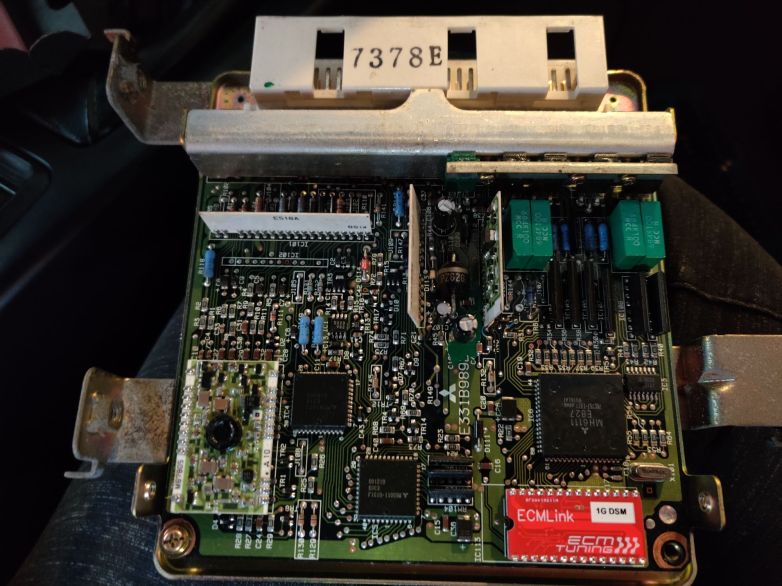
ECMLink… If there was a single requirement to being a modern DSM tuner, this is it. A tiny chip that replaces the EPROM on the car’s ECU, transforming it into a wide open tuning platform. I’m truly in awe of just how much you can accomplish with this single, minute change. Probably a 20 minute change, start to finish, leaves you with wide open access to every single aspect of the car’s operation. I didn’t take many photos during the process, but two trim panels expose the ECU which is held lovingly by just 4 bolts. After disconnecting it, 4 small screws open the ECU to reveal it’s beautifully simple design.
In this photo, the ECMLink is already installed (the small, red chip in the lower right). It just takes the place of the socket-set EPROM chip that normally contains the ECU data. Perhaps my favorite part of ECMLink is the community and collective knowledge and effort that exists around it. I’d even argue that the default maps on the chip run the car better than it did stock with the upgrades I have. I think this is largely because there is no longer a need for the SAFC airflow converter that allowed the car to run using it’s upgraded MAF, fuel system, and larger-than-stock turbo. Removing the SAFC from the car just involved taking it out of the MAF signal wire to the ECU and reconnecting it directly. Now, the ECU already knows exactly what to do with these parts.
Another huge benefit of this package is its logging capability. The car now has a USB port in the glovebox that any laptop can connect to and log all the data you want straight from the ECU for tuning and diagnosis. This has opened my eyes to several aspects of the car’s operation, most importantly that the ECU is seeing some knock at higher boost levels. This has prompted me to back off on the boost a bit for now.
So, what else is new?
Well, the less exciting work I’ve done on the car was a new set of spark plugs, and a compression test. The plugs are effectively the meta choice for the car, NGK BPR6ES plugs. Although I snagged a set of 7ES’s as well for future tinkering. While those plugs were out, I took the opportunity to do a compression test and the results were… results.
Based on the compression test, all of the cylinders are in-spec on pressure, although one is close to the low end. And, because one cylinder is low compared to the rest, the engine doesn’t fall within the max acceptable variance. Given that it’s a single cylinder, I’m assuming it’s either a worn ring or valve. For the time being, I don’t have a reason to suspect it’s anything worse, but time will tell once I finally get this engine out and open.
From the day I brought it home, I knew that the brakes on the eclipse…. weren’t great. The car suffered from pretty severe brake drag at several wheels, and was still sporting its original rubber brake lines. Oh boy.
My shopping list started out with stainless brake lines and caliper seal kits for all four wheels, sounds easy! Sadly, that won’t be the last of the expenses. (Don’t worry, it doesn’t get too bad). Before starting this work, I had to bring the eclipse back from a friend’s garage where it had been staying while I made space to keep it in my own. On that drive, which was the longest the car had been on since I got it home, the brake drag issue became apparent. Both of the front brakes were constantly dragging with at least 5% pressure as well as one rear. While this didn’t make the car impossible to drive, it did slow it down. Ohh, and it meant that the brakes got INCREDIBLY hot. I knew things weren’t going great when I could smell the burning pads halfway home and I already began to feel the rotors warping more and more with every mile. Add new rotors to the shopping list.
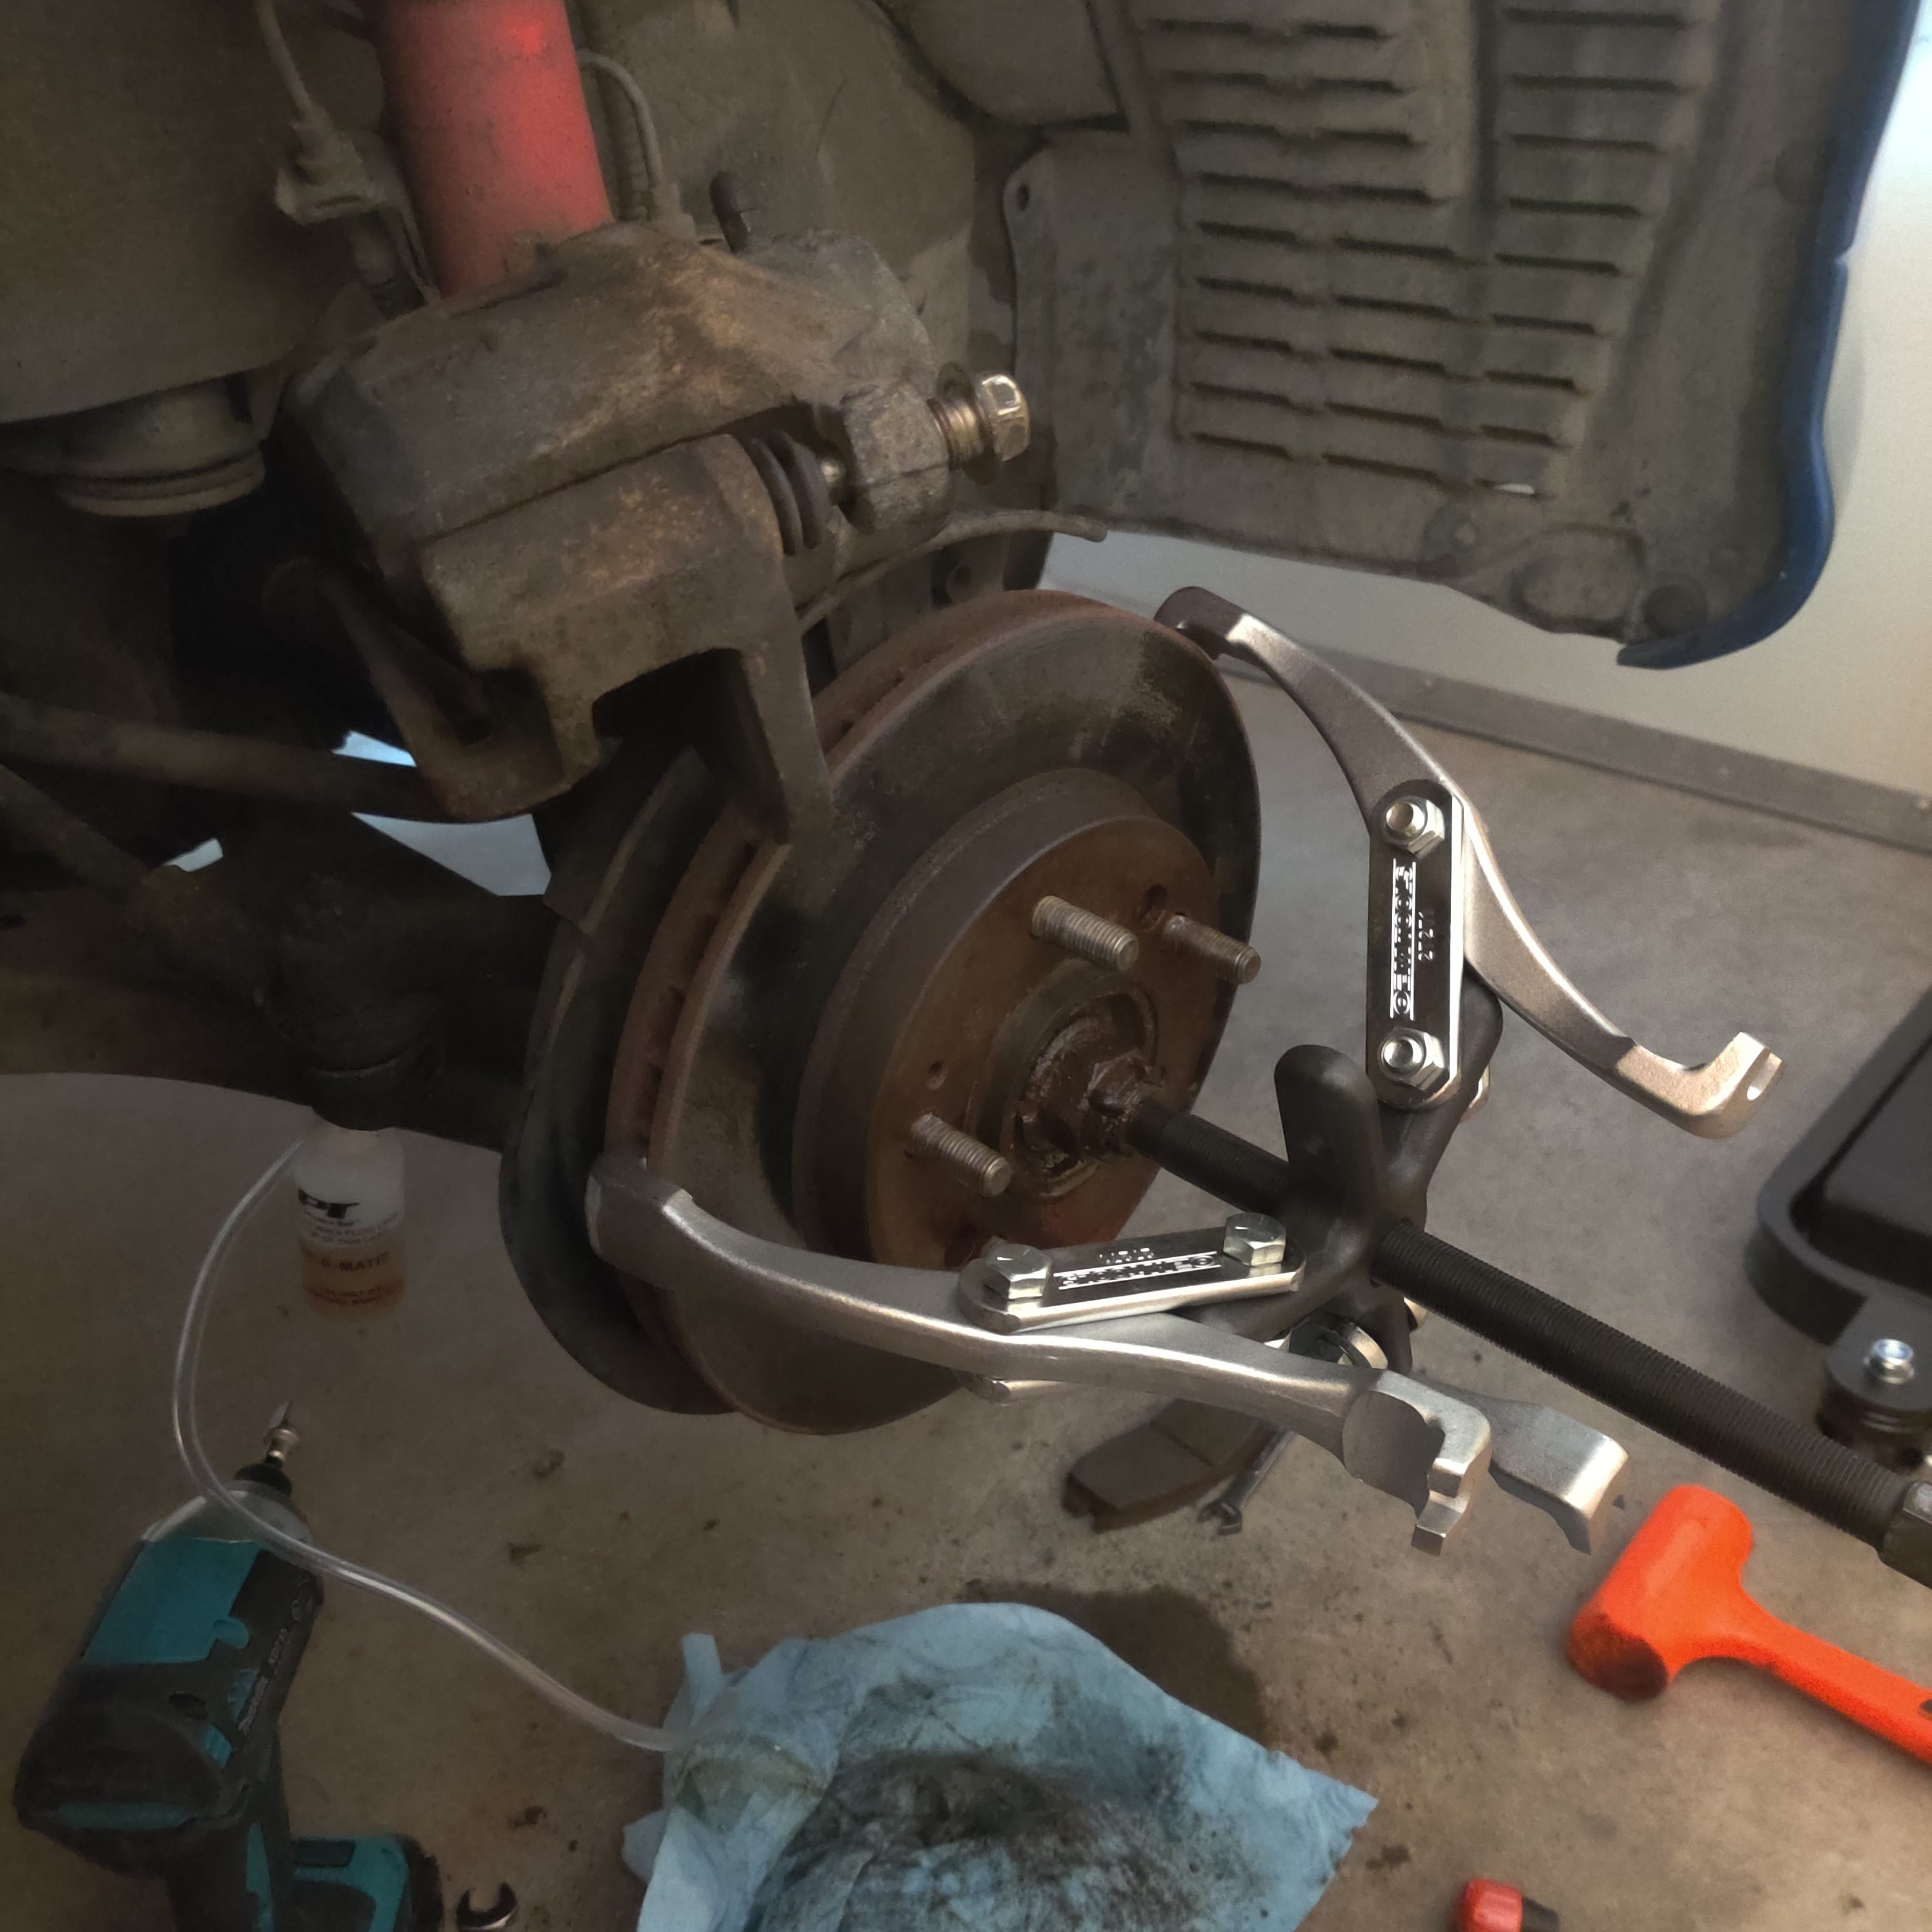
When I first got the car in the air, I immediately began pulling the front brakes off. A task I’ve done a good many times by now, I was prepared to have the car ready for new parts in a single afternoon. What I wasn’t prepared for, was just how bad the rotors had warped from the heat of that drive home. Now, both front rotors were firmly seized onto their hubs with an unfathomable pressure due to them losing their shape. Fortunately, the nearest auto parts store had a massive pulley extractor they were willing to let me borrow. Unfortunately even with this, I wouldn’t be able to muscle up the torque to break the rotor free.
This story has a happy ending though. My best idea at this point was to soak the hub in penetrating oil, torque the extractor onto the hub as tightly as I could manage, and walk away. “Maybe it will eventually just come free!” I thought, and incredibly that’s exactly what happened with both wheels. So with a little patience, the front brakes were apart and ready for the rebuild.
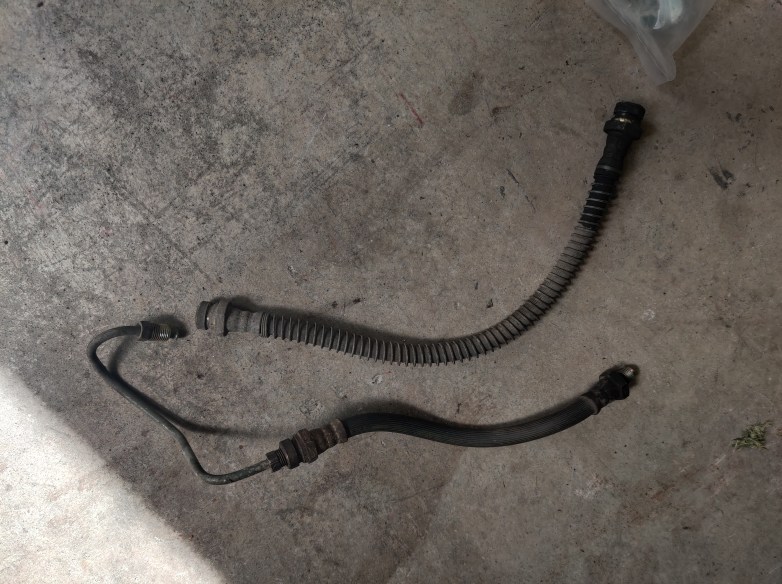
A little sidenote about the brake lines that someone engineer cooked up in the late 80s at Mitsubishi. At each wheel, the eclipse has not one brake line, but 3 at each front and 2 at each back. They appear to employ a design where one soft line section goes form the wheel arch to the suspension, which is responsible for accommodating suspension travel. Then, it either meets another soft line at a bracket (rear), or it joins a short section of hard line (front) before connecting to another soft line. This lower section is then only responsible for accommodating the motion of the wheel turning (in the case of the front wheels). Why this was chosen over a single line that would flex as necessary under both turning and suspension travel, I have no clue, perhaps it has to do with where the line meets the caliper? I can say that after plenty of research, I found that Mitsubishi abandoned these brakes entirely just as fast as they abandoned the pop-up headlights.
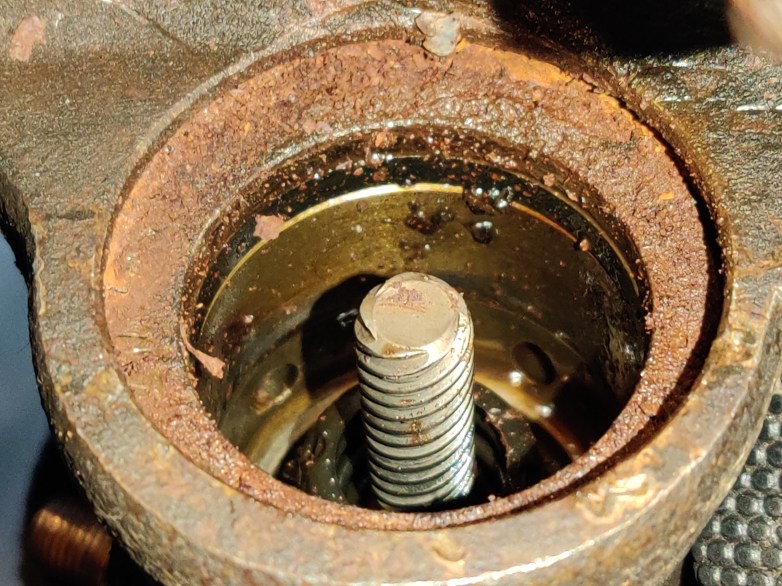
This fact actually caused me a good bit of headache when buying the parts for this work. I learned that for the first 2 years of the eclipse, the GSX and GS were equipped with the same brakes. Then, when the 1G eclipse got its facelift, it silently got bigger rotors and different calipers. Every parts database on earth though, seems to have lost this information and so if you attempt to buy brake parts for a pre-facelift GSX, you’ll be sold parts to fit a post-facelift GSX. The only way to get the correct rotors then, was to order brake rotors for a 1G eclipse GS. While this fact did cause me to have to buy and exchange a set of rotors, it’s hardly an inconvenience.
Now, let’s talk calipers.
While I originally intended to rebuild all four calipers on the car, I eventually decided that I’d rather replace the fronts with remanufactured OEM calipers since it’s the kind of work I’ve never done before. Honestly, I would have done all four this way however I couldn’t find any remanufactured rear calipers at the time. The front calipers showed up quickly with new hardware and they took just a fraction of an afternoon to slap on complete with the new, correctly sized rotors and a set of pads and get the system bled.
The rear calipers were a different story. Originally I only planned to do the front brakes when I thought that all the brake drag was happening at the front of the car, but after taking a drive with the new front brakes and old rears, I could easily tell that while almost all of the brake drag was gone, it wasn’t all gone. While I still couldn’t get my hands on remanufactured rear calipers, I did still have the rebuild kit that I had originally picked up, so rebuild them I did.
I wish I had taken more pictures of this process, but I just got to doing it one day and before I knew it, I had finished the job. It involved pulling apart the calipers and giving them an initial brushing before letting them spend an hour in an ultrasonic cleaner. I went back over the exterior of the caliper with a steel brush for a good while before re-greasing and assembling everything. The eclipse parking brake mechanism is integral to the rear calipers, which gave them some added complexity and required me to go out and buy a special set of long reach snap ring pliers to get them back together, but all worked out. The rears went back together just as easily as the fronts, although I chose to keep the old rotors for now as they didn’t end up warping like the fronts. One more brake bleed and a test drive later, the car rolls as free as can be.
This brake job marks the end of the initial work I have planned for the car prior to its engine rebuild, so it’ll be lying in wait until it’s time to get that started. I expect the process to take quite some time beyond just the rebuild and reseal. I want to give the block a thorough cleaning and I’m ready to have the it leveled and honed at a machine shop if it’s too far out. Beyond that, I plan on measuring the cylinders and bearing surfaces to get oversized rings and bearings to take up any slack. Otherwise, it’ll probably get new ones at spec just for peace of mind. Beyond that, new gaskets, seals, belts and pulleys await the car, as well as a new clutch and water pump. I’ll probably give the oil pump a once over too while it’s apart, but I have no plans to replace it.
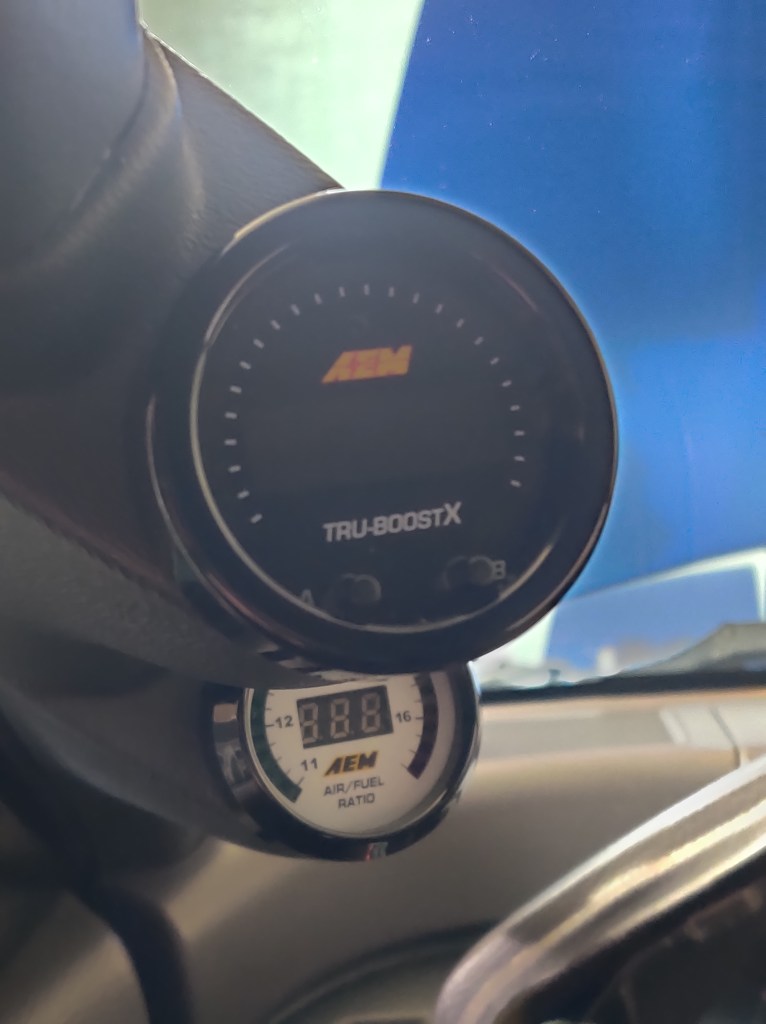
Boost creep and a power steering fluid leak are my biggest concerns on the car at this time. When I originally bought the car, it was equipped with a brass manual boost controller zip tied to the radiator fan, which I’ve since replaced with an AEM boost controller. The new AEM controller not only provides an adjustable boost solution, it also serves as a more accurate boost gauge than the decades-old analog gauge that was previously installed.
Unfortunately, the new gauge has only revealed a previously unknown issue. While the previous gauge showed that the car reliably made a very consistent 14psi of boost pressure, the new gauge shows that this number was nowhere close to accurate. In fact, the previous controller was providing well over 20 pounds of boost and that pressure was consistently climbing as the throttle stayed open. After installing the EBC though, and tuning it all the way down to zero restriction (running the wastegate at spring pressure) the climbing boost was still present. Even with the controller completely bypassed, it turns out the wastegate just can’t keep up.
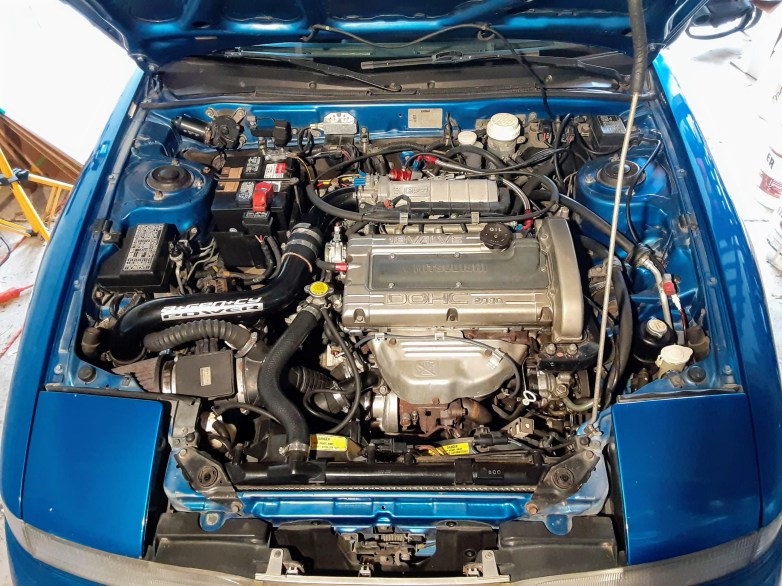
As I’ve mentioned previously, closer look at the turbo on this car reveals that it was taken from an EVO 3. This turbo is nearly identical to the eclipse’s 16G but has a larger compressor wheel. This turbo is connected to a 3 inch turbo back exhaust which allows it to flow like crazy.
I first suspected that the car’s waste gate actuator may not have been working correctly so I removed it for some inspection. While the unit is sealed and can’t be examined internally, it appears to work as intended. Still, I’m not ruling out replacing it with a new adjustable actuator from kinugawa in the future. At this time though, my suspicion is that the wastegate simply can’t flow enough exhaust to spool down the turbo. I know there are some options like wastegate porting which I’ll look into once the engine is out of the car and I can better understand the shape of the turbo itself, but for now my solution is to just take it easy on the gas pedal.
As for that power steering fluid? The steering rack is coated in the stuff, from end to end. It’s not a notable leak in any one location and I haven’t had to add fluid, but the seals are certainly gone. So, one more seal and gasket kit goes in the shopping cart.
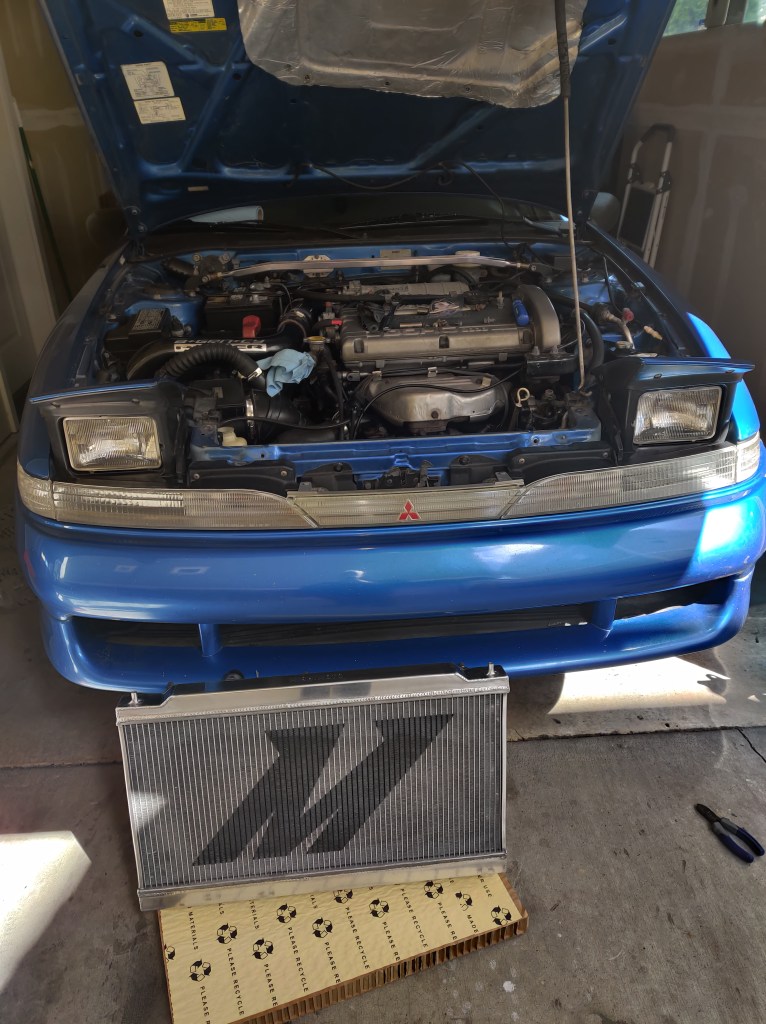
I recently broke down on a warm saturday and installed one of the parts that I’ve been saving for the big engine rebuild; a Mishimoto aluminum radiator. While it isn’t a massive crossflow racing radiator, it eliminates the plastic capped factory rad AND is substantially thicker. The radiator is sold as a “drop in fit” which is almost the experience I had as well, save for a small modification, and a small mistake on my part..
Like all of the work I’ve done on this car, this task was shockingly easy compared to working on a more recent vehicle, 2 sockets and a screwdriver did the entire job. The car’s radiator sits on a pair of bushings at the bottom and is held down by a pair at the top, each secured by a 2 bolt bracket at either corner. No additional components had to come out in order to remove the radiator once I loosened the band clamps on the coolant hoses.
A quick test fit after removing the OEM radiator quickly revealed that while no “modification” would be needed to install the mishimodo rad, it would not fit while the AC radiator was installed. Fortunately the A/C in this car is long dead, already drained, and it’s something I’ve been planning on removing from the beginning, so out it went! It took some scraping and chipping to get through the solidified crud that entombed the forward facing bolts that secured it to the A/C lines but they came out easy enough once I had them free, I just had to be careful not to erroneously mess with the power steering fluid loop that also sits in the front bumper.
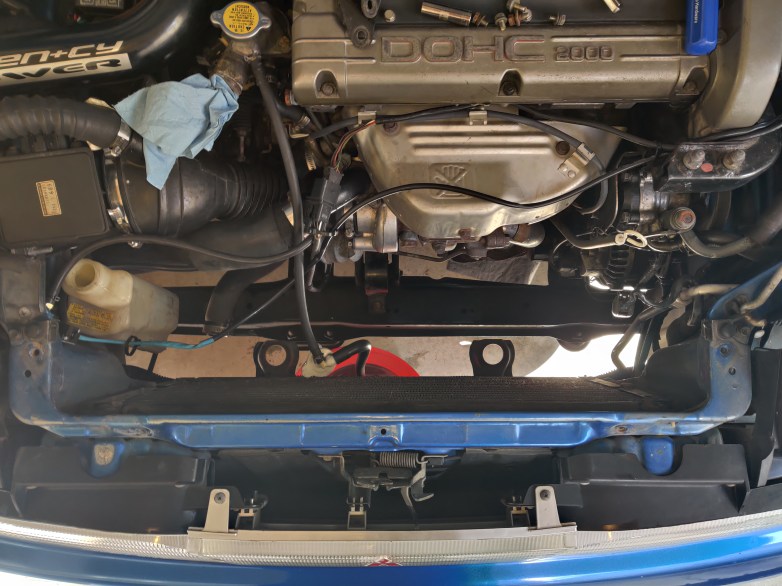
With that radiator out of the way, I went on to transfer the fans and fan switch from the old radiator. I wound up slipping off of the fan switch with the wrench I was using and damaging the connector so I had to make a run to a nearby auto parts store for a new one, but this was the only trouble I ran into during this install.
After installing the fans and new switch, the rad dropped right into place without issue. I went ahead and replaced the coolant hoses with new mishimoto hoses as well since I was working in the area and while probably not original, the existing hoses weren’t in the best shape. There was something really nice about just how easily the rad slid into place and met with the existing bushings, regardless of how dried out they were.. (One part I haven’t been able to find a replacement for just yet)
Voila! With the A/C radiator out of the way and the hardware all installed, the top brackets fit right onto the new rad just as they fit the old one. I topped up the coolant reservoir and partially pre-filled the radiator before clamping down all the hoses and starting the car up to get the fluid moving. It took a minute for the idle to fall to normal speeds as it got all the coolant flowing while I kept the heater on full blast. Before long the reservoir level stopped dropping and the job was done, theres one future radiator failure avoided! Now if only I wouldn’t have to drain all this coolant anyway in a few weeks when the engine gets pulled out…
In some spare time this evening I decided to rummage around in the box of parts that was given to me along with the car when I purchased it. I’m still wrapping my head around what all of it means (in the case of several sets of fuel injectors) and what some of it is (heaps of gromets and bushings for who really knows). One thing I can certainly identify though is a set of unopened aftermarket clear corner lights (above, with amber marker bulbs).
I have yet to stop being amazed at just how easy this car is to work on. At this point I’d almost bet that with a single screwdriver and a 10mm socket you could perform a full engine swap. A series of short phillips screws stare you right in the face when you open the hood, allowing you to remove all 5 housings of the car’s front lighting fascia in about 60 seconds. At 2 screws a piece, including the unlit center portion which has to come out first, it really couldn’t get any easier.
I finally found the blinker fluid reservoir. Pulling these slimy, foggy enclosures out was wildly satisfying. After installing new corner and marker bulbs and attaching a set of metal clips that allow the headlight/signal lenses to hook onto these on the outside edge, they went back in. It became painfully apparent though once the headlights were back in that they were far far brighter in appearance than the still cloudy original headlight lenses. A single use refinishing kit sorted this out mostly, however the driver side housing has several bad seals in it which has let dirt accumulate inside it for quite some time. I filled the housing with dilute simple green and left it to soak for a while before spilling it out and leaving it to dry which loosened some of the junk but far from all of it. After dropping in new turn signal bulbs this work was over.
When it came into my hands, the GSX had an analog boost gauge and a brass manual boost controller. The car was tuned to deliver about 14lbs of boost and it did so well and consistently, but this was a little old school for me.
Enter, the AEM Tru-BoostX controller. This little number is a combo digital boost gauge and controller and included a shiny new boost control solenoid. The box showed up and with the help of a friend we got right to installing it. I yanked out the old gauge and chose to reuse the vacuum line that was already feeding it rather than running my own and I fed its harness down the same path as the existing AFR gauge harness.
The install was dead simple, largely thanks to the existing vacuum line and gauge pod from the previous owner. I’m less thankful though for his wiring job… I went to find the power source for the gauge and discovered its ends shoved under some key-on fuse under the dash… not great… but it works. This is definitely something I’m coming back to later. I spliced the power used for the AFR into the boost gauge and fed its harness through the firewall to hook up the solenoid.
Mounting the solenoid was easy as well. We selected a spot just behind the passenger side headlight where we drilled a pair of holes and bolted it in place. (After painting inside the fresh holes and putting a padded backing on the solenoid) The existing vacuum lines here were less impressive and so they were replaced with some fresh ones which we tied into place. With that, I hooked the battery up and clicked the key to ACC and the system fired right up.
Install done! But now to tune it…
Unfortunately this will have to wait, as just after the installation, a discovery was made. The car fired right up with the controller turned off, but as one of us reached to move something under the hood, the idle dropped and the car struggled to keep running. I got out and with the car idling, began tapping and prodding around under the hood. Each time I’d touch something around the MAF sensor, the idle would nearly die and then it would surge back. What was going on?
Talk about DIY
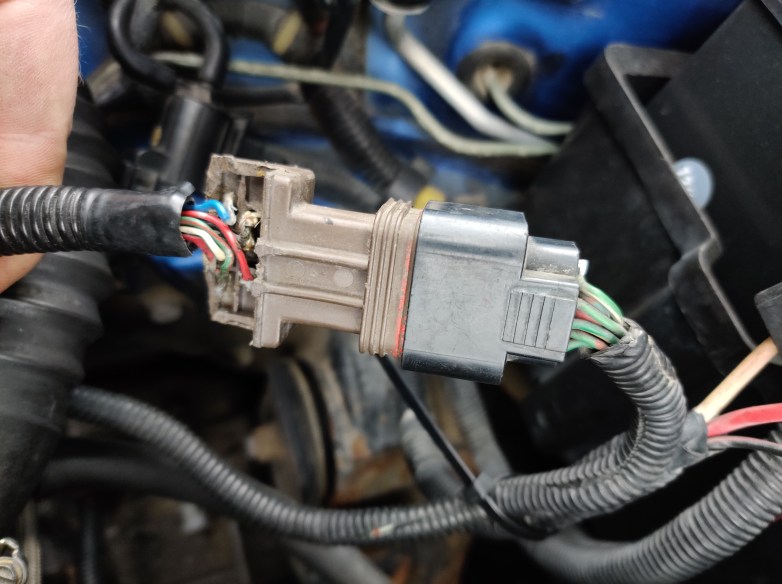
After a little more prodding, we found that the idle would fall whenever the intake or its harness was moved around. Following the harness back, it was immediately clear that the home made adapter connecting the later generation MAF to the earlier generation car was the culprit. It appears as though, rather than cutting the wires in the middle and soldering them together, a previous owner saw fit to dremel off the end of the old connector and solder wires from the MAF harness directly to the exposed internal contacts. Several of these solder joints were corroded and some were hanging on by a single strand. One was broken, and moving the connector around would disrupt the airflow signal to the ECU.
A new adapter is on the way while this one awaits the trash can, but tuning the boost controller will have to wait.
The GSX uses a cable operated manual transmission. A set of levers and pivots just under the shifter boot changes the length of two steel cables connecting it to the transmission under the hood. At the ends of each of these pivot points, there are soft polymer bushings that keep things in place. These bushings degrade, and the ones in this car haven’t existed for quite some time, meaning there was a TON of play in the shifter.
This felt like some low hanging fruit and a satisfying way to spend an afternoon and get something done that could be immediately appreciated. I jumped online, ordered a full set of bushings, and a few extras, and waited impatiently for their arrival.
The job was an easy one and over in 30 minutes. The assembly came apart with ease while the remains of the original bushings crumbled out. I cleaned up the area with a shop vac and wiped all the parts clean before applying a new coat of assembly grease. A total of 4 soft bushings, 2 hard bushings, and a little plastic cup that accommodates the left-right motion of the shifter went into the assembly and brought it back to like new condition. The play is gone and the shift is crisp as can be!
Although the car still likes to grind going into reverse…
Buying a car that someone else has modified is a risky venture. There’s no guarantee that they’ve done what they say they’ve done, or more importantly, that they’ve done it well. I knew the risk I was taking when I got this car and it’s critical that I find and understand exactly what has been done and how well it’s bene done.
The car has a short list of modifications that have been installed… Beyond the simple ones like an Agency Power charge pipe, Megan Racing suspension braces (not pictured), and 3.5″ Megan Racing turbo-back exhaust, an upgraded fuel pump, regulator, and injectors have been installed, and an Apexi S-AFC 2 is wired in to control them.
Cars of a fine vintage such as this one were much electronically simpler than modern vehicles. This is one of the many reasons that a car from this era makes such a good project. When replacing parts like injectors and regulators to deliver more fuel, a modern car would have it’s ECU programmed with a new fuel delivery curve to do just that, take advantage of the new parts and deliver more fuel. The brain of the GSX is much simpler though and the tune is written into a programmable memory chip that sockets onto the board. The AFC offers a workaround by tapping into the car’s harness where it connects to the ECU and intercepting the signal from the airflow sensor. The module can then modify the signals sent to the ECU to trick it into doing things like delivering more fuel. This one is also receiving airflow measurements from a MAF sensor taken from a later generation eclipse that was fitted into this car.
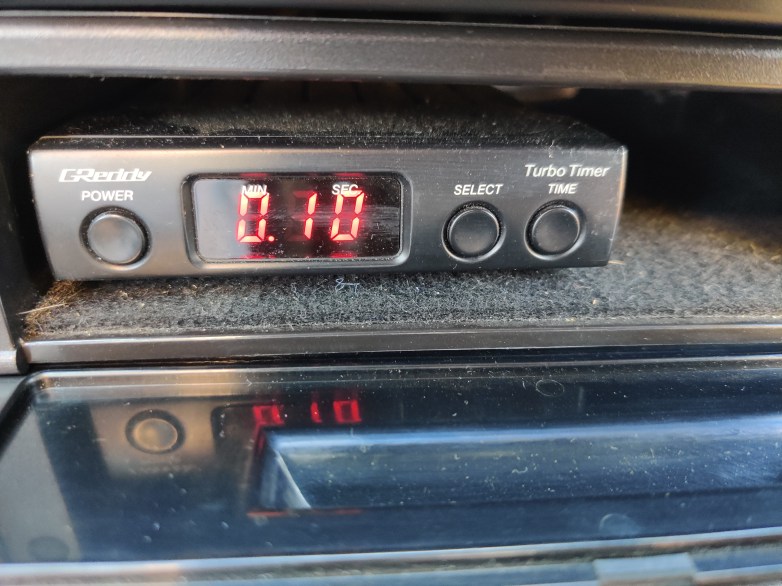
Another piece of tech support that this car receives comes in the form of this Greddy turbo timer. The GSX is equipped with an oil cooled turbo, meaning that unlike modern cars, coolant isnt used to reduce the turbo’s temperature. Instead, it relies on the flow of oil from the lubrication system to draw heat away from the unit. Normally this isn’t an issue (this turbo has been working fine for 3 decades!) however there is a risk of damage if the car is driven hard and then quickly shut off. While coolant would continue to flow to a modern turbo at this point, the oil immediately stops flowing and this car’s turbo is left to sit and smolder, which can be damaging.
The turbo timer wires into the ignition harness and the ECU and keeps track of how long the car has been running and how hard its being driven. Then, when the car is shut off, the turbo timer begins to play a cheerful little song while it counts down from whatever time it has decided the car should run for. The timer ensures that the car sits at idle RPM, keeping the oil pump running without battering the turbo with hot exhaust gas so that the circulating oil can help it cool down before turning off.
Once the timer reaches zero, the car shuts off as usual with the turbo safely cooled. The idea behind the turbo timer, I guess, is that you can take your keys, lock the car, and go into the store and let the car cool itself down and shut off. In reality though, all you need to do is remember to let the car idle for a few minutes before shutting it off after getting it all heated up. Plus, leaving the car unattended while it idles in neutral isn’t something I’m crazy about. While it isn’t a critical piece of tech in the car, it does at least remind you to let it cool down when you remove the key and the car doesn’t stop running. Plus, who could resist a little computer that plays you a song when you get out of the car?
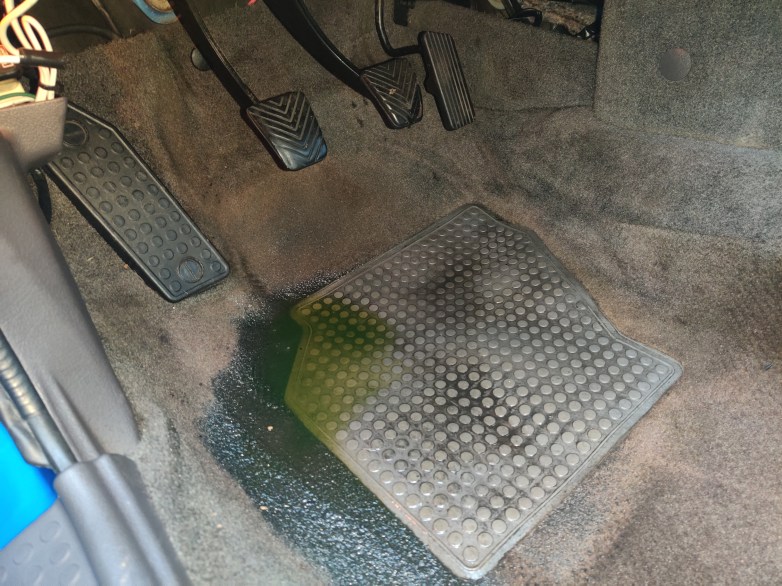
Well here we are, a couple of rainy, dreary, cold weeks after bringing the GSX home, I’ve found a day to go spend some time with it. It seems the car didn’t appreciate being left outside alone for that long and has chosen to communicate that to me by accumulating a generous puddle of antifreeze in the footwell by the pedals. Great.
I sopped up the green puddle and removed some trim so I could pull up the carpet and dry the padding underneath, plus I’ll never pass up the opportunity to do some inspecting. The paint under the carpet is pristine, thankfully, and the puddle didn’t get anywhere it could have done any real damage. Still… where did it come from? The heater core was my only guess.
A week later I returned to find another, much smaller, and much less green puddle in the same place, which only made things more peculiar. If this was rainwater, how was it getting in? and why was it full of antifreeze last time? I’d get to the bottom of this if it was the last thing I did.
I began by searching for evidence of water entry. I started at the windows and the hatch, and worked my way down until I spotted a damp strip of trim at the bottom of the passenger door panel. Pulling the panel off, I was greeted with plenty of moisture all through the door panel and an aftermarket door speaker that was both wet and mossy. Lucky for me, removing the stereo in its entirety is something I’d already been thinking about for a while. In a project car I’d prefer to remove as much unnecessary complexity as possible (I’m looking at you next, A/C).
Time to figure out what’s going on here… I sat in the car while a friend dumped a bucket of water over the door and in seconds, a stream came spilling in right through the door speaker, literally seeping through the cone itself. What? I needed to dig deeper, and dig I did. I took out the slimy door speaker and tossed it straight in the bin before finding the root of the issue. The door speaker was actually mounted to a baffle which I can only assume was intended to PROTECT it from water dripping through the inside of the door, a completely normal thing (that’s why doors have drains at the bottom). However, this baffle protruded so far into the door that it instead caught the stream of water as it ran through the door and funneled it INTO the back of the speaker, through the vapor barrier, and right into the car. (Into the door panel first, which explains why the speaker grille has a touch of rust on it).
Problem found! I pulled the opposite door panel, extracted both speakers and baffles, tucked the speaker wires and sealed the holes with some plastic sheeting. We repeated the water bucket test on both doors to be sure before putting the door panels on and sure enough, bone dry! I lined the floors with towels and pig mats both over and under the carpet to sop up all the moisture and left with a smile.
But where did that antifreeze come from? I’m honestly not sure… it’s very possible that the heater core has a slow leak which combined with the rainwater to make a larger green puddle, but I would have expected to find at least some antifreeze in the water the second time. My second theory is that at some point in its life, antifreeze was spilled in the car, soaked into the carpet and pads, and just allowed to dry. Then, the entering rainwater rehydrated the dried coolant which created the green puddle.
I’ve dreamt for years about a project car. Occasionally, I’d click around craigslist and look at some overpriced, abused, clattering deathtrap and consider it for a few hours. But I would pass it by, certain that I’d soon find an affordable example of one of the models that I was intent on building. hah.
Eventually I came to realize that my chances of finding a clean example of a MK3 Supra, 300ZXTT, 240SX, or some JDM model sporting an engine starting with KA, RB, or 2J, were slim. These legendary cars were once affordable dime-a-dozen project platforms, but as years passed their numbers dwindled while their popularity only grew. Even the most abused, neglected, questionable examples were plagued by the drift tax which pushed them out of my budget. I knew I had to expand my search, so expand I did.
If I didn’t make a move soon, I may never get the chance to. The golden age of tuner cars ended decades ago and with each passing week, fewer and fewer examples from this era survive. I began combing through craigslist and facebook nightly. For weeks I searched and waited for something to speak to me while meeting my small set of criteria. It had to be affordable, running, rust free, turbocharged, and have its interior in tact. Finally one night I stumbled across the picture at the start of this post, and the last listing I would need to read.
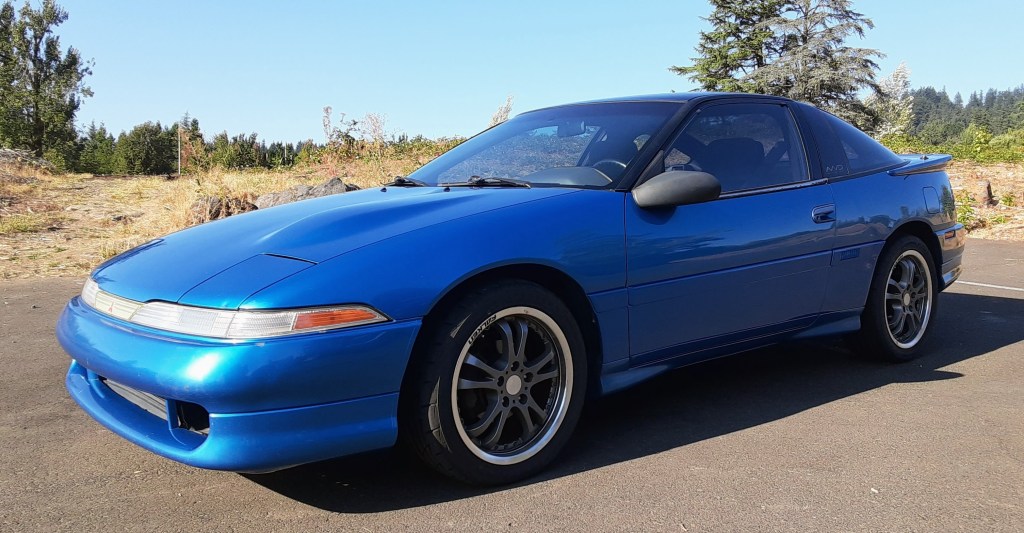
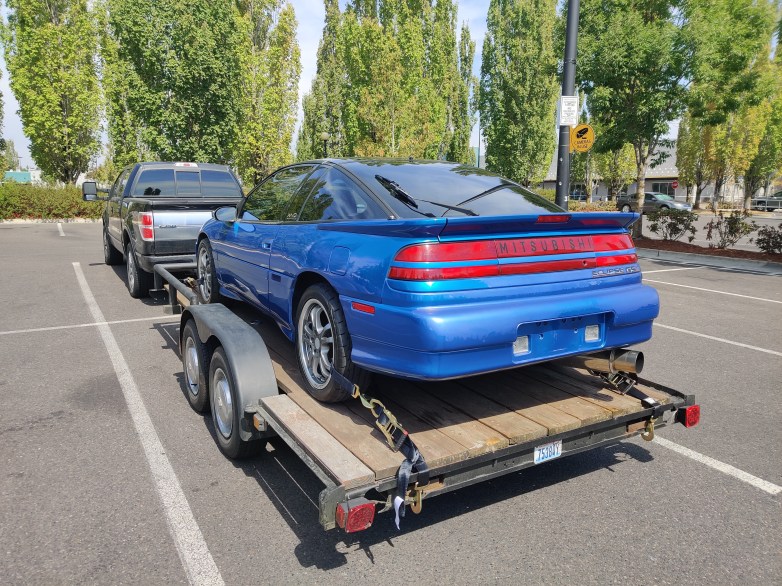
A 1990 Eclipse GSX, a family of cars that I had honestly forgotten about by this point. They weren’t even on my radar and I don’t really remember how I found this listing. Regardless, the longer I looked at the car and read about it, the more I immediately fell for it. The first generation DSM was a car I’m not sure I had ever laid eyes on before finding this one, which only added to its coolness. The car was 150 miles away and the next morning at 7am I was climbing into a friend’s pickup with cash in hand and trailer in tow.
I’ll never forget seeing the car in person for the first time. We sat in a Walmart parking lot waiting for the seller when I saw it in the rear view mirror roll in. I did my best to contain my excitement until I had thoroughly looked over the car and done the haggling. The seller was nice, knew a fair bit about the car and its modifications but also attributed some to previous owners. He wore an old t-shirt sporting the name of a tuning company though, and spoke with confidence, so I found him trustworthy.
The car wasn’t without it’s shortcomings of course. The clutch slips, the steering rack leaks, the paint and trim have baked in the Arizona sun, the trunk hasn’t held itself open in ages, and the AC is long dead. A previous owner also saw fit to bolt two large CB antenna mounts to the roof which wouldn’t be going anywhere. But these are all things that I could either fix, or live with.
All it took was one drive. By the time I got back to the parking lot I knew the car was coming home with us. I put on my best show, appearing uncertain as I picked at the car’s flaws before throwing out an offer below the seller’s already very cheap asking price. It took a few minutes and some meeting in the middle, but as the existence of this blog probably already reveals……